


Introduction
In this project you will connect up a Raspberry Pi computer and find out what it can do.
What you will make
The Raspberry Pi is a small computer that can do lots of things. You plug it into a monitor and attach a keyboard and mouse.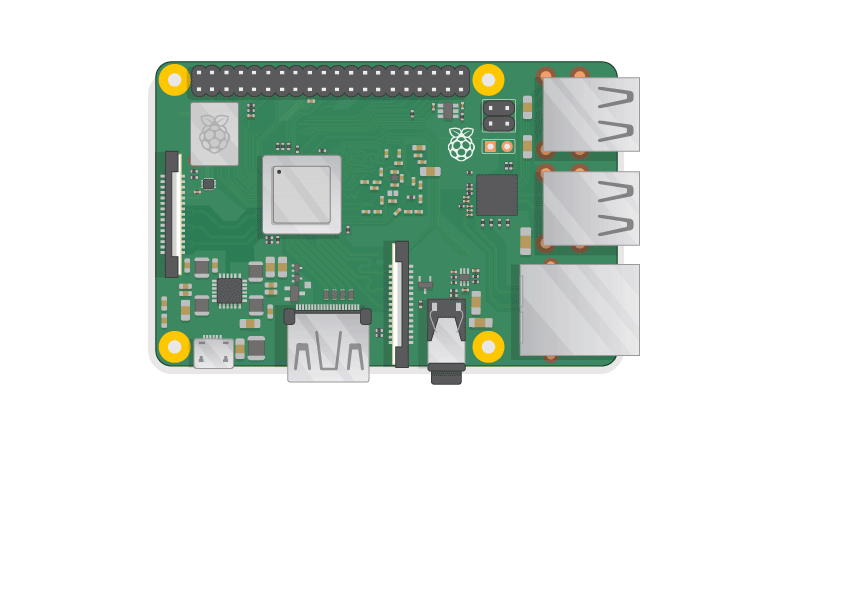
What you will learn
This project covers elements from the following strands of the Raspberry Pi Digital Making Curriculum:
Use basic digital, analogue, and electromechanical components
Additional information for educators
If you need to print this project, please use the printer-friendly version.
Use the link in the footer to access the GitHub repository for this project, which contains all resources (including an example finished project) in the ‘en/resources’ folder.
What you will need
Hardware
A Raspberry Pi computer with an SD card
A monitor with a cable (and, if needed, an HDMI adaptor)
A USB keyboard and mouse
A power supply
Headphones or speakers (optional)
An ethernet cable (optional)
Software
Raspbian, installed via NOOBS
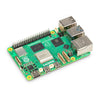
Meet the Raspberry Pi
Let’s take a look at the Raspberry Pi. You should have a Raspberry Pi computer in front of you for this. It shouldn’t be connected to anything yet.
Look at your Raspberry Pi. Can you find all the things labelled on the diagram?
USB ports — these are used to connect a mouse and keyboard. You can also connect other components, such as a USB drive.
SD card slot — you can slot the SD card in here. This is where the operating system software and your files are stored.
Ethernet port — this is used to connect the Raspberry Pi to a network with a cable. The Raspberry Pi can also connect to a network via wireless LAN.
Audio jack — you can connect headphones or speakers here.
HDMI port — this is where you connect the monitor (or projector) that you are using to display the output from the Raspberry Pi. If your monitor has speakers, you can also use them to hear sound.
Micro USB power connector — this is where you connect a power supply. You should always do this last, after you have connected all your other components.
GPIO ports — these allow you to connect electronic components such as LEDs and buttons to the Raspberry Pi.
Connect your Raspberry Pi
Let’s connect up your Raspberry Pi and get it running.
Check whether your Raspberry Pi already has an SD card in the slot at the underside, and if not, insert an SD card with Raspbian installed (via NOOBS).
Note: Lots of micro SD cards will come inside a larger adapter — you can slide the card out using the lip at the bottom.
Installing Raspbian with NOOBS
Find the USB connector for your mouse, and connect the mouse to one of the USB port on the Raspberry Pi (it doesn’t matter which one).
Connect the keyboard in the same way.
Look at the HDMI port on the Raspberry Pi — notice that it has a large flat side on top.
Make sure your monitor is plugged into a wall socket and turned on.
Connect the monitor cable to the Pi’s HDMI port — use an adapter if necessary.
Nothing will display yet.
If you want to connect the Pi to the internet via Ethernet, use an Ethernet cable to connect the Ethernet port on the Raspberry Pi to an Ethernet socket on the wall or on your internet router. You don’t need to do this if you’ll be using WiFi or if you don’t want to connect to the internet.
Sound will come from your screen if it has speakers or you can connect headphones or speakers to the audio jack if you have them.
Notice that the micro USB power port has a longer flat side on top.
Plug the power supply into a socket and connect it to the micro USB power port.
You should see a red light on the Raspberry Pi and raspberries on the monitor.
The Pi will boot up into a graphical desktop.
Finish the setup
When you start your Raspberry Pi for the first time, the Welcome to Raspberry Pi application will pop up and guide you through the initial setup.
Click Next to start the setup.
Set your Country, Language, and Timezone, then click Next again.
Enter a new password for your Raspberry Pi and click Next.
Connect to your WiFi network by selecting its name, entering the password, and clicking Next.
Note: if your Raspberry Pi model doesn’t have wireless connectivity, you won’t see this screen.
Click Next let the wizard check for updates to Raspbian and install them (this might take a little while).
Click Done or Reboot to finish the setup.
Note: you will only need to reboot if that’s necessary to complete an update.
A tour of the Raspberry Pi
Now it’s time to take a tour of the Raspberry Pi.
See that Raspberry up in the top left-hand corner? That’s where you access the menu: click on it, and you will find lots of applications.
Click Accessories and choose Text Editor.
Type I just built a Raspberry Pi in the window that appears.
Click on File, then choose Save, and then click on Desktop and save the file as rp.txt.
You should see an icon named rp.txt appear on the desktop.
Your file has been saved to the Raspberry Pi’s SD card.
Close the text editor by clicking the X in the top right-hand corner of the window.
Return to the Raspberry menu, choose Shutdown, and then choose Reboot.
When the Pi has rebooted, your file should still be there.
The Raspberry Pi runs a version of an operating system called Linux (Windows and macOS are other operating systems). It allows you to make things happen by typing commands instead of clicking on menu options. Click on the Terminal at the top of the screen:
In the window that appears, type:
ls
and then press Enter on the keyboard.
This will list the files in your home directory.
Now type this command to change directory to the Desktop:
cd Desktop
You have to press the Enter key after every command.
Type:
ls
Can you see the file you created?
Close the terminal window by clicking on the X.
Now drag rp.txt to the Wastebasket on the desktop so the Pi will be ready for the next person.
Browsing the web
You might want to connect your Raspberry Pi to the internet. If you didn’t plug in an ethernet cable or connect to a WiFi network during the setup, then you can connect now.
Click the icon with red crosses in the top right-hand corner of the screen, and select your network from the drop-down menu. You may need to ask an adult which network you should choose.
Set Wi-Fi Country
Type in the password for your wireless network, or ask an adult to type it for you, then click OK.
When your Pi is connected to the internet, you will see a wireless LAN symbol instead of the red crosses.
Click the web browser icon and search for raspberry pi.
This article is from raspberry pi, for more details, please refer to: raspberry pi official website