


This Raspberry Pi RetroPie Handle Game HAT will turn your Raspberry Pi into a classic game
console in asecond, recalls you all the gaming pleasures in the memory.
Note:
Please focus on the direction of battery, if you reversely connecting the battery, the charging circuit will be damaged, so please pay attention to it when you mounting the battery.
Features:
- 3.5 inch IPS screen, 480×320 resolution
- 60 frame experience, smoothly display, no more frame loss
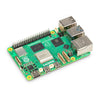
- Compatible with Raspberry Pi A+/B+/2B/3B/3B+ (Raspberry Pi Zero/Zero W/Zero
- WH requires another HDMI cable)
- Integrates battery charge circuitry, powered from one 18650 lithium battery (NOT
- included), plays anywhere anytime
- Battery capacity indicator
- Onboard speaker and earphone jack, listen to the familiar BGM from the old days
Keys Introduction:
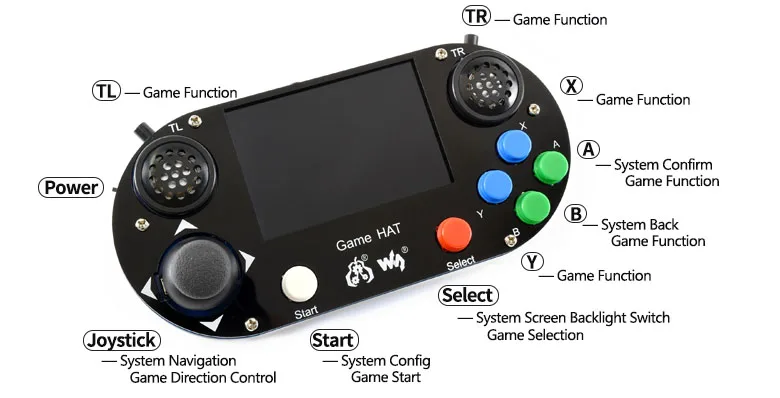
- Game function keys according to specific game
- Start+Selection to exit current game
- Menu, Up/Left, Down/Right, Exit, this four keys on the bottom allow to adjust
- screen brightness/contrast, volume, etc.
How To Use
HARDWARE CONNECTION
1. Insert Raspberry Pi to Game HAT (GPIO pins header)
2. Connect HDMI. Insert the HDMI connector to screen and Raspberry Pi
- If you use Raspberry Pi Zero/Raspberry Pi Zero W, you need to use HDMI cable
3. Toggle the Battery switch of Game HAT to OFF, and mount 18650 battery to it.
OS
We provide image with driver pre-installed, you can download test image or you can also download original Retropie image and install driver manually.
METHORD 1 USING TEST IMAGE
(1) Download test image according to your Raspberry Pi
- Retropie-RPi2_RPi3-Image
- Retropie-RRi_zero-Image
(2) Unzip the ZIP and write the image file to TF card
(3) Inset the ready TF card to your Raspberry Pi, toggle Battery switch to ON.
- If battery is low, Raspberry Pi cannot start up. In this case, you can connect a 5V/2A power supply to Power interface of Game HAT for charging. Charge indicator will flicker when charging. You can play during charging but note that Raspberry Pi will reboot automatically if you disconnect the power supply.
- If battery is full Raspberry Pi will start up normally.
(4) After entering OS, you can choose emulators by joystick. For example, choose Nintendo emulator and press “A” to confirm.
(5) You can see there are some games. Choose one and press “A” to enter. After cutscene, you can press “A” or “Start” key to start the game.
(6) If you want to exit from current game, you can press buttons “Start” and ”Select” at the same times
(7) You can press the 4 buttons on the right side of Game HAT to adjust volume and brightness of LCD, Press Menu to open OSD menu, and press Up/Left or Down/Right to choose options, then press Menu to confirm option and adjust it.
Finally, press Exit to exit OSD menu.
METHORD 2 INSTALL DRIVER MANUALLY
Driver for Retropie
Please download Retropie image on Retropie website according to the type of your Raspberry Pi.
(1) Download and unzip it to get .img file
(2) Write the .img file to TF card by Win32DiskImager.exe
(3) After writing, copy Game HAT driver you download to root directory of the TF card.
(4) Open the config.txt file which is also on root directory, append these statements to
config file
hdmi_force_hotplug=1
hdmi_group=2
hdmi_mode=87
hdmi_cvt=640 480 60 1 0 0 0
(5) Insert the TF card and a USB keyboard to Raspberry Pi, open Battery switch to power on Raspberry Pi. After booting, press F4 to open Terminal.
(6) Execute commands as blow. (Make sure you have copy driver to Raspberry Pi as
step 3)
sudo tar xzvf /boot/Game-HAT-*.tar.gz

cd Game-HAT/

sudo ./Game-HAT
(7) Reboot Raspberry Pi. Long press “A” button (other keys are OK as well) to enter buttons configuration page. Configure keys as below. You can also long press “A” or other buttons to pass the configuration.
After configuring:
- 1 Press “A” button to save configurations and exit.
- 2 Press “B” button to cancel configurations and exit without save.
(8) The configuration is finished and you can try to play games now.
ADD NEW GAMES
Maybe default games in test image are not those you want, you can also add games as you like.
1. Size of most games are always large, so we need to expand filesystem fist. Choose RASPI-CONFIG on configure page and press enter

Choose 7 Advanced Options -> A1 Expand Filesystem, Enter->Finish, (physical keyboard is required)
Choose OK, and reboot.
2. Prepared game ROMS.
Here we recommend a really cool rom website: http://coolrom.com/
You can download ROMS of various games there to your PC. If you like Sony Playstation games, you can choose.
Find the games you want and download it. For example:
http://coolrom.com/roms/psx/39719/Tekken_3.php Click to download
unzip the zip you download to get ROMs as below
3. Update ROMs
Connect your Raspberry Pi to network (Make sure the network you connect is in
the same LAN as your PC). Find SHOW IP in Retropie list, press “A” to query
current IP address of your Raspberry Pi.
Open it with the IP address on your PC

Copy ROMs to related directory as below
Then on emulator choose page, you can press “Start”->QUIT->RESTART EMULATIONSTAION, press “A” to confirm. Then restart emulator, you can find the game added.
OTHER COMMON OPERATIONS
For more operations, you can read Retropie Instructions
https://retropie.org.uk/docs/
PINS (LCD)
If the pins which are note with NC it means that the pins is not used by LCD, you can
use them for other usage.
|
PIN Identity Description 1 3.3V 3.3V power input |